Bore Micrometer: The Complete Guide to Internal Measurement Precision in 2026
Everything you need to know about selecting, reading, and maintaining a bore micrometer for accurate internal diameter measurements — from workshop basics to professional-grade techniques.
What Is a Bore Micrometer?
A bore micrometer is a precision instrument designed specifically for measuring the internal diameter of holes, cylinders, and bores. It delivers accuracy down to 0.01 mm (that's 10 micrometers, for reference) and is indispensable in engineering, automotive repair, and manufacturing quality control.
I've been tinkering with measurement tools for years now — started out just doing bits and pieces at home, fixing up an old motorbike engine in the garage off the Upper Newtownards Road. That's where I first realised a standard outside micrometer simply won't cut it when you need to check cylinder wear. You need something that reaches inside.
The basic principle is straightforward. Three anvils (or two, depending on the design) extend outward to contact the bore wall. You read the measurement from the thimble and sleeve, just like an external micrometer. The difference? The geometry is built for internal surfaces.
Key specification: Most bore micrometers cover ranges in 25 mm increments (e.g., 50–75 mm, 75–100 mm). Resolution is typically 0.01 mm for analogue and 0.001 mm for digital micrometers. Accuracy sits at ±0.004 mm for quality instruments conforming to BSI standards (BS 870).
So why not just use a vernier caliper? Honestly, for rough work, a caliper is fine. But when you're checking whether a cylinder bore has worn beyond its 0.05 mm service limit, you need the precision only a dedicated internal measuring tool provides.
How It Works: Anatomy and Mechanics
The internal micrometer uses the same screw-thread principle as its external cousin — 1 full rotation of the thimble moves the measuring face exactly 0.5 mm along the spindle axis.
Core Components
Here's what you're working with:
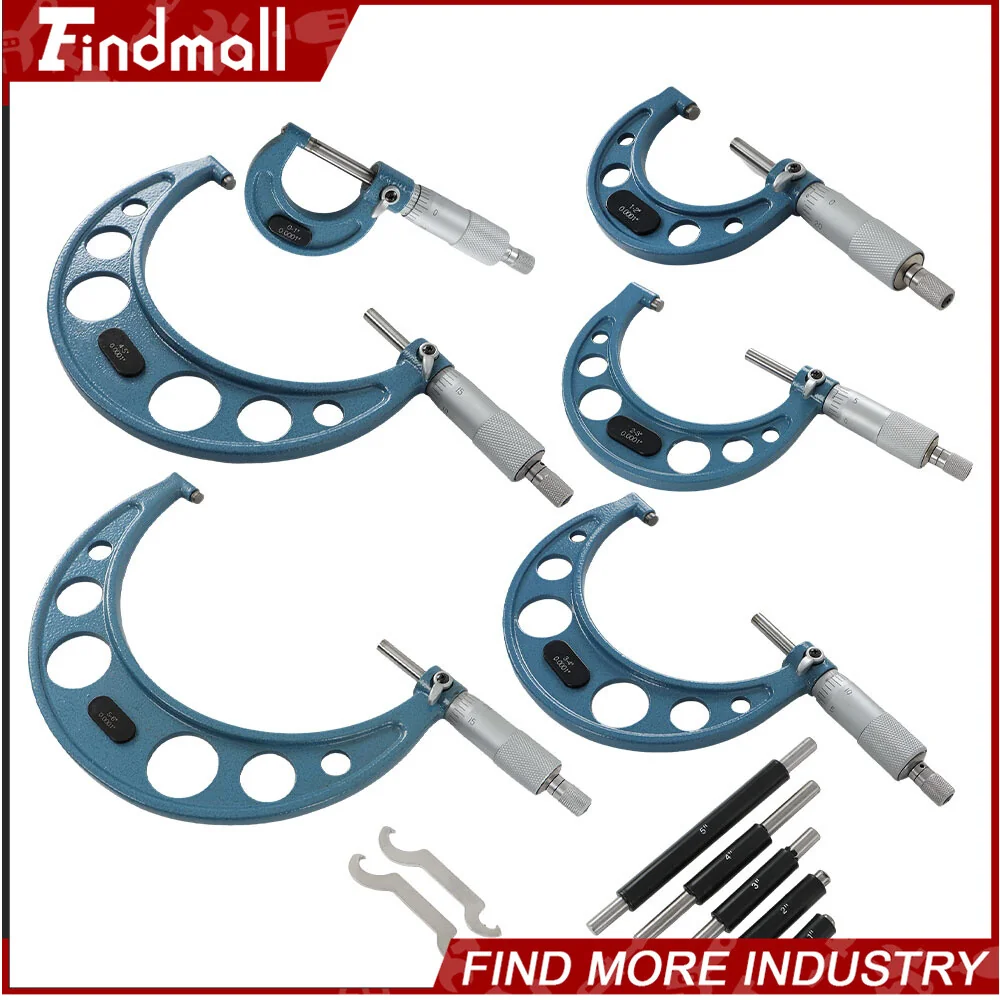
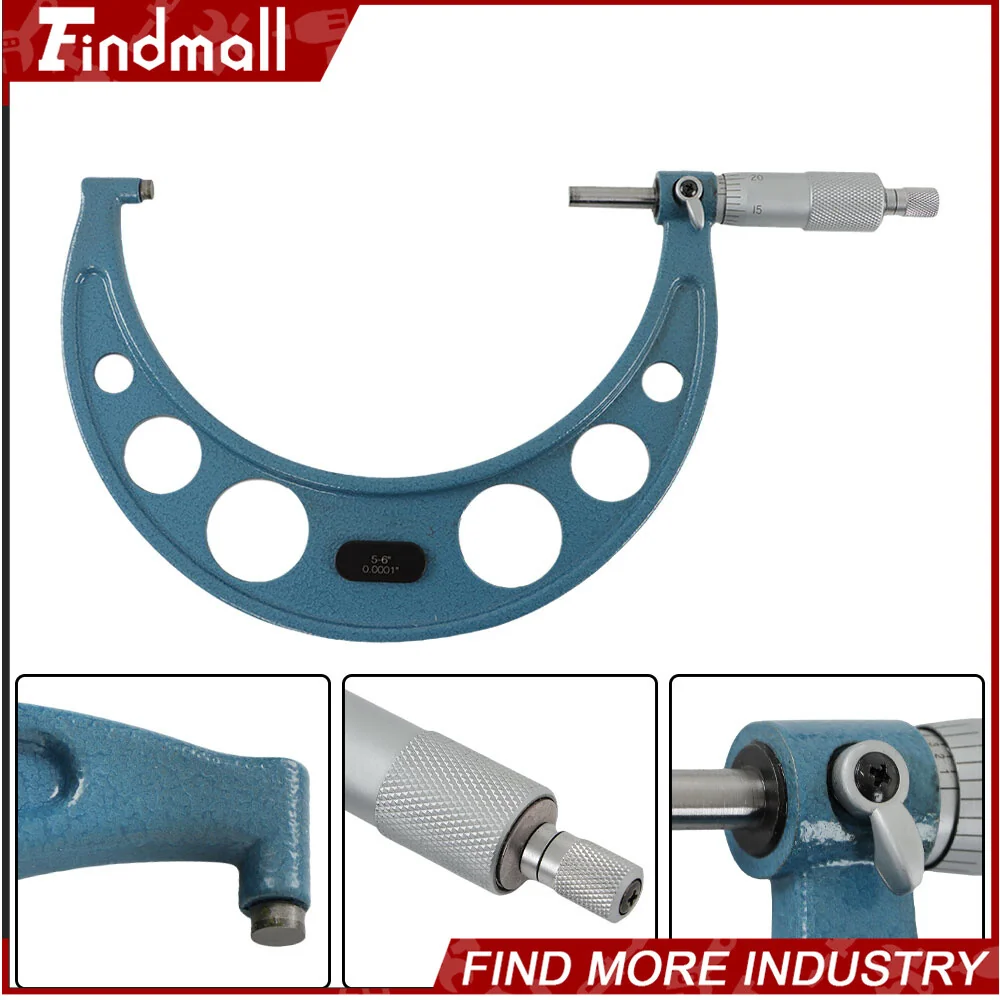
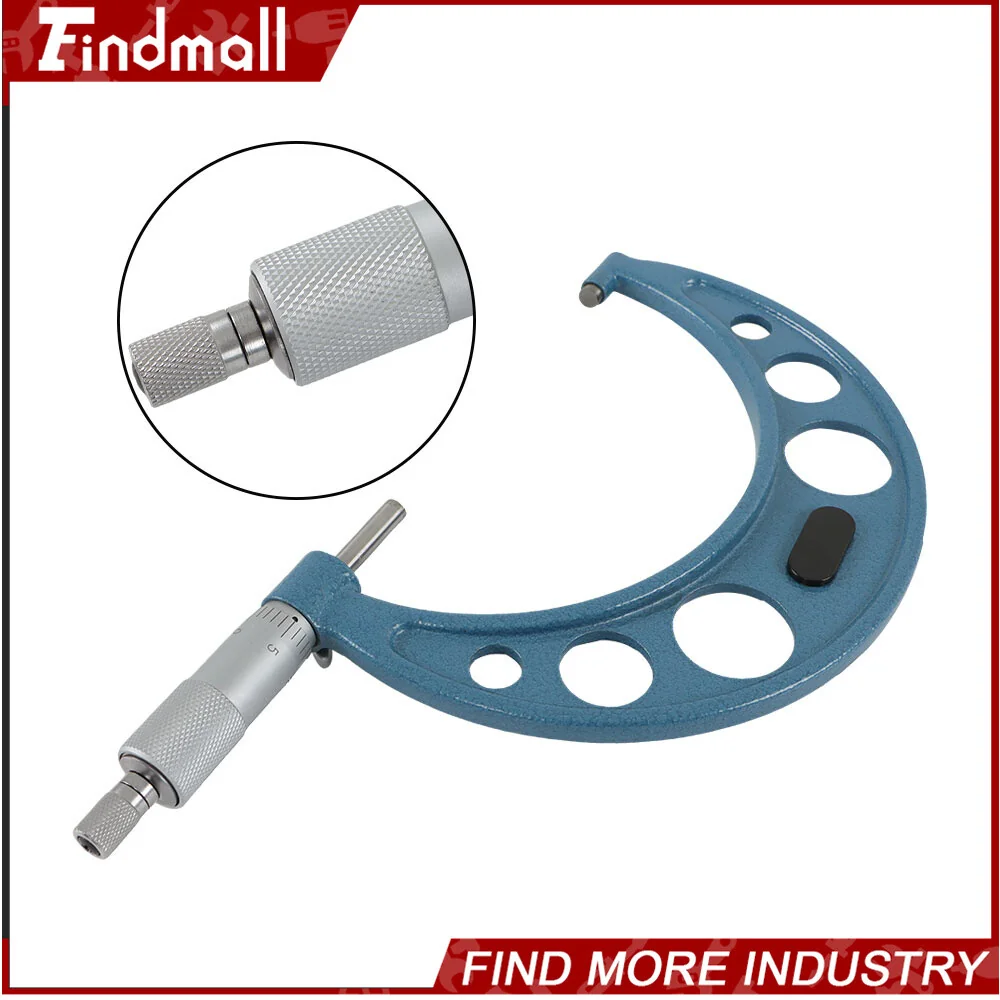
- Measuring head: Contains the three self-centring anvils that contact the bore wall
- Thimble: The rotating barrel you turn to extend the anvils — graduated in 0.01 mm divisions
- Sleeve (barrel): Shows the main scale in 1 mm and 0.5 mm increments
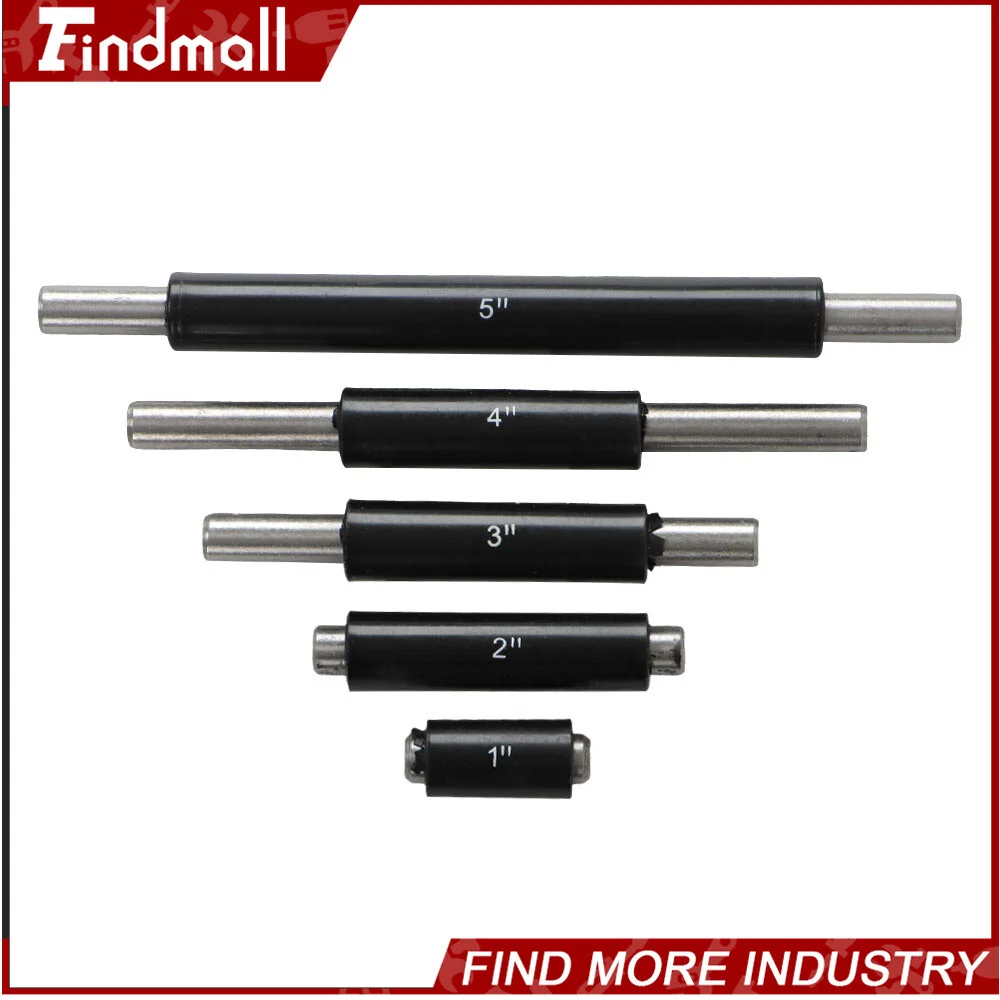
- Extension rods: Interchangeable rods that extend the measuring range (typically in 25 mm steps)
- Ratchet stop: Limits measuring pressure to a consistent 5–10 N of force
The Measurement Process
You insert the head into the bore, gently rock it to find the true diameter (the maximum reading across the axis), then lock the thimble. That rocking motion is critical. Skip it and you'll get a chord measurement, not the actual diameter. I learned that the hard way — well, actually, my mate pointed it out after I'd been getting inconsistent readings for a solid twenty minutes., a favourite among Britain’s tradespeople
For those converting between units: 1 mm equals 1,000 micrometers. So when someone says "1 micrometer to 1 mm," they're talking about a factor of 0.001. A reading of 75.032 mm is 75,032 micrometers. The mm to micrometer conversion trips people up, but it's just moving the decimal three places.
How to Read a Micrometer: Step-by-Step
Reading a micrometer correctly is the single most important skill for accurate measurement. Get this wrong and everything else is pointless.
Analogue Reading Method
Here's how to read a micrometer in four steps:
- Read the sleeve main scale: Count the fully visible millimetre lines. Say you see 7 full lines — that's 7.00 mm.
- Check for the half-millimetre line: If a 0.5 mm line is visible beyond the last full mm, add 0.50 mm. Running total: 7.50 mm.
- Read the thimble: Find which thimble graduation aligns with the datum line on the sleeve. If it's 32, add 0.32 mm. Running total: 7.82 mm.
- Read the vernier (if fitted): Some instruments have a vernier scale giving an extra 0.001 mm resolution. If line 6 aligns, add 0.006 mm. Final reading: 7.826 mm.
Digital Micrometer Reading
With a digital micrometer, the LCD displays the measurement directly. No mental arithmetic needed. That's brilliant for speed, but I'd still recommend learning the analogue method first. Why? Because batteries die at the worst possible moment, and understanding how to read micrometer scales manually means you're never stuck.
Digital micrometers typically display to 0.001 mm resolution and offer mm/inch switching, zero-set functions, and data output via SRS-232 or USB. The Proster micrometer set includes both digital and analogue options for this exact reason — flexibility matters in a real workshop.
Pro tip: When learning how to read the micrometer, practise with gauge blocks first. Set the micrometer to a known standard (say, a 25.000 mm gauge block) and confirm your reading matches. Do this ten times. You'll build muscle memory for the rocking technique and reading sequence simultaneously.
Types of Internal Micrometers Compared
Not all internal measuring tools are the same. Here's how the main types stack up against each other — I've used most of these at various points, and each has its place.
| Type | Range (mm) | Resolution | Accuracy | Best For | Typical Price (£) |
|---|---|---|---|---|---|
| Three-point bore micrometer | 6–100+ | 0.001–0.005 mm | ±0.004 mm | Precision cylinder work | £80–£350 |
| Two-point internal micrometer | 5–300+ | 0.01 mm | ±0.008 mm | General bore checking | £40–£200 |
| Tubular internal micrometer | 50–1500 | 0.01 mm | ±0.01 mm | Large bores, pipes | £60–£250 |
| Digital bore gauge | 10–150 | 0.001 mm | ±0.003 mm | Production line speed | £100–£500 |
| Proster Micrometer Measuring Tool | 0–25 (external) + sets | 0.01 mm | ±0.004 mm | Versatile workshop use | £126.13 |
The three-point design self-centres automatically — that's a massive advantage over two-point types where you must rock the tool manually. For engine rebuilds and precision machining, three-point is the standard. But for general workshop checks? A quality two-point instrument or a versatile set like the Proster micrometer screw gauge at £126.13 gives you decent bang for your buck., meeting British quality expectations
Worth the extra spend on a three-point? If you're doing this daily, absolutely. For occasional use, a two-point with extension rods covers most jobs.
Choosing the Right Tool for Your Application
Your choice depends on three factors: the bore size you're measuring, the accuracy you need, and how often you'll use it.
Automotive Applications
Engine cylinder bores typically range from 70–100 mm. You need ±0.005 mm accuracy minimum to assess wear against manufacturer tolerances. A three-point bore micrometer with a 50–100 mm range covers most passenger car engines. For motorbike cylinders (my personal interest), you're often looking at 40–70 mm bores.
General Engineering and Maintenance
Bearing housings, hydraulic cylinders, pipe fittings — these all need internal measurement. The Proster outside micrometer set paired with an internal gauge gives you both external and internal capability without breaking the bank.
Quality Control and Inspection
Production environments demand speed and repeatability. Digital micrometers with data output let you log measurements directly to SPC software. If you're working to ISO 9001 standards, your measurement uncertainty needs documenting — and that means calibrated instruments with traceable certificates.
The UK Government's National Measurement Strategy emphasises traceability to national standards. For any measurement that affects product safety or regulatory compliance, your instruments must have current calibration certificates traceable to UKAS-accredited laboratories.
Budget Considerations for 2026
Prices have shifted this spring with supply chain adjustments. Entry-level bore measurement tools start around £25–30 (the Proster Micrometer Measuring Tool at £126.13 is spot on for beginners). Mid-range three-point sets run £150–300. Professional Mitutoyo or Bowers sets? You're looking at £400–800+.
Start with a quality basic set and upgrade as your needs become clearer. No point spending £500 on a tool that sits in a drawer., popular across England
Calibration and Maintenance
A micrometer is only as good as its last calibration. Drift happens — thermal expansion, mechanical wear, the odd drop onto a concrete floor (we've all done it).
Calibration Intervals
For workshop use, calibrate every 6–12 months. Production environments? Every 3–6 months or after a set number of measurements (typically 5,000–10,000 uses). The Health and Safety Executive doesn't mandate specific intervals for micrometers, but if your measurements affect safety-critical components, documented calibration schedules are essential.
Daily Checks
- Zero-check against a setting ring or gauge block before each session
- Clean measuring faces with lint-free cloth and light oil
- Check for smooth thimble rotation — any grittiness means contamination
- Verify the ratchet stop clicks consistently
Storage
Keep instruments in their cases. Sounds obvious, but I've seen too many precision tools rattling around in toolbox drawers. Temperature matters too — store between 15–25°C and let the tool acclimatise to workshop temperature for 30 minutes before measuring. A 10°C temperature difference on a steel bore can cause 0.012 mm of thermal expansion per 100 mm of diameter. That's enough to throw your readings off.
Common Mistakes and How to Avoid Them
After years of using these tools, I've made — and seen — every mistake going. Here are the ones that catch people out most often.
Not Rocking the Instrument
This is the big one. You must rock the bore micrometer gently across the bore axis to find the true maximum diameter. Without this, you're measuring a chord, not the diameter. The difference can be 0.02–0.05 mm on a 75 mm bore — significant enough to make a good engine look worn out.
Ignoring Temperature Effects
Steel expands at roughly 11.7 µm per metre per degree Celsius. On a 100 mm bore, a 5°C difference between the workpiece and the micrometer means approximately 0.006 mm error. Handle the tool by its insulating grip, not the frame.
Over-Tightening
Always use the ratchet stop. Forcing the anvils against the bore wall deforms the contact points and gives false readings. Consistent measuring force (typically 5–10 N) is non-negotiable for repeatability.
Skipping the Zero Check
Takes 30 seconds. Saves hours of rework. Just do it every time. That said, if your zero is consistently off by the same amount, it might indicate wear on the measuring faces — time for a service or replacement., with availability in Scotland
Using the Wrong Size Range
Extension rods add flexibility but also add potential error sources (each joint introduces ±0.001–0.002 mm uncertainty). Use the shortest configuration that covers your bore size. If you're measuring a 62 mm bore, use the 50–75 mm head directly rather than a 25–50 mm head with a 25 mm extension.
Frequently Asked Questions
How do you read a bore micrometer?
Read the sleeve scale for whole and half millimetres, then read the thimble for hundredths. For example: 7 mm on the sleeve + 0.5 mm half-line visible + 0.32 on the thimble = 7.82 mm. Always rock the instrument to find the maximum reading, which represents the true bore diameter. Digital models display the value directly to 0.001 mm.
What's the difference between a bore micrometer and a bore gauge?
A bore micrometer gives a direct measurement reading from its own scale. A bore gauge is a comparative instrument — it measures deviation from a set reference size and must be zeroed against a setting ring or external micrometer first. Bore gauges are faster for repetitive checks in production, while internal micrometers provide absolute measurements without a reference standard.
How do I convert mm to micrometer units?
Multiply millimetres by 1,000 to get micrometers. So 1 mm equals 1,000 micrometers (µm), and 0.01 mm equals 10 µm. Going the other way, 1 micrometer to 1 mm is simply dividing by 1,000 — so 50 µm = 0.050 mm. This conversion is essential when reading specifications that mix metric units.
How accurate is the Proster Micrometer Measuring Tool?
The Proster Micrometer Measuring Tool offers ±0.004 mm accuracy with 0.01 mm resolution, priced at £126.13. It's suitable for workshop-level precision work including automotive, hobby engineering, and general maintenance tasks. For context, that accuracy level detects wear smaller than a human hair (approximately 70 µm diameter).
Do I need a digital micrometer or is analogue sufficient?
Analogue micrometers are perfectly sufficient for most workshop tasks and don't require batteries. Digital micrometers add speed (instant readings to 0.001 mm), eliminate reading errors, and often include data output for logging. Choose digital if you're taking many measurements quickly or need to record data. Choose analogue for reliability and lower cost — the Proster range at £126.13 covers both options.
How often should I calibrate my bore micrometer?
Calibrate every 6–12 months for general workshop use, or every 3–6 months in production environments. Perform a zero check before every measurement session using a gauge block or setting ring. If the instrument has been dropped or shows inconsistent readings, recalibrate immediately regardless of schedule. UKAS-traceable calibration certificates cost £30–80 per instrument.
Key Takeaways
- A bore micrometer measures internal diameters to ±0.004 mm accuracy — essential for cylinder wear assessment, bearing housing checks, and precision engineering work.
- Always rock the instrument when measuring to find the true diameter (maximum reading across the bore axis).
- Three-point designs self-centre automatically, making them faster and more reliable than two-point types for precision applications.
- The Proster Micrometer Measuring Tool at £126.13 provides workshop-grade precision (0.01 mm resolution) suitable for automotive and general engineering tasks.
- Temperature control matters: a 5°C difference causes approximately 0.006 mm error on a 100 mm bore measurement.
- Calibrate every 6–12 months and zero-check before every session — a 30-second habit that prevents costly measurement errors.
- Digital micrometers eliminate reading errors and offer 0.001 mm resolution, but analogue instruments remain reliable, battery-free alternatives for field work.
Ready to try PROSTER?
Shop Now — £126.13